Note: Because of the fact that this article is an interview with an english speaking Armada veteran, it is as an exception also provided in English. Please excuse my terrible
English.
Last week we discovered that the mightiest weapon of the Empire, the Imperial Star
Destroyer, has a dangerously vulnerable Achilles heel. As Sith Lord of carrots this fact disturbs Darth Veggie quite a lot. Hence, he searched the internet for a solution. And it seems he
has found one and is even willing to share it with you: In the last big online Star Wars: Armada tournament (played via Vassal) 40 players met in 4 preliminary and 3 elimination
rounds. No player commanding a fleet containing an ISD managed to score enough tournament points to get to elimination round - no player apart from one: PT106 (FFG forum nickname) and his
Admiral Motti and his Flying ISD Circus fleet. (Sidenote: Another player managed to get with an ISD fleet into the elimination rounds, but this happened thanks to a special wild card
rule not due to tournament points).
PT106 won the first three preliminary round games, two with a 10-0 and one with a 9-1 score. The 9-1 was against Ginkapo who later won the entire tournament. PT106 lost the fourth preliminary
round (but only by a margin of victory of 79 points and this was against Matt and his notorious Rogue Madness fleet, which has merely been beaten twice in 44 games).
PT106 entered the elimination rounds with 32 tournament points (33 achieved the top player of the preliminary rounds). Allthough he lost his first elimination match against Gowtah (who faced
Ginkapo in the final match), this happened by the smallest possible Margin of Victory, namely 0 (!).
If we switch our attention to a real gaming table, PT106 and his ISD based fleet has also conquered many gaming tables: He has won two US regional tournaments and he was among the top 8 players
of the North American Championship (not to confuse with the smaller US national championship).
It seems that this PT106 might solve Darth Veggie's problem of the ISD 2 Achilles heel! Hence, we are glad that he consented to give us an interview. Before we start with the interview we want to
have a quick look at his fleet.
Admiral Motti and his ISD Flying circus (Wave 4 version)
Faction: Galactic Empire
Points: 393/400
Commander: Admiral Motti
Imperial I-Class Star Destroyer (110 points)
- Intel Officer ( 7 points)
- Ordnance Experts ( 4 points)
- H9 Turbolasers ( 8 points)
= 129 total ship cost
Imperial II-Class Star Destroyer (120 points)
- Agent Kallus ( 3 points)
- Gunnery Team ( 7 points)
- Quad Laser Turrets ( 5 points)
- Electronic Countermeasures ( 7 points)
- X17 Turbolasers ( 6 points)
= 148 total ship cost
Raider-I Class Corvette (44 points)
= 44 total ship cost
Gozanti-class Cruisers (23 points)
- Comms Net ( 2 points)
= 25 total ship cost
[ flagship ] Gozanti-class Cruisers (23 points)
- Admiral Motti ( 24 points)
= 47 total ship cost
I am pretty sure we all have seen double ISD builds, however, this list is quite unusual: First, it has five activations which is quite difficult to achieve with two ISDs in a fleet. On top of
that there is even a serious bid for initiative included (7 points). This has of course its price: There are no squadrons, not a single one! Oh, and none of the two notorious
must-be-in-any-Imperial-fleet-included-cards (Major Rhymer and Demolisher) are part of the flying ISD circus. How can such an ISD fleet be successful? Let us ask PT106 (real
name Paul).
Admiral Darth Veggie: Hi Paul, thanks for giving this interview. During the last big Vassal tournament I discovered that you maneuver a double ISD fleet, one of them a
ISD 2- and you did so quite successfully. What do you consider the most interesting, important, or characteristic aspect of the ISD 2 in Star Wars: Armada?
Paul: I think that ISD2 is a universal ship that can fit a lot of roles (flagship/carrier/brawler/control) with the only
caveat of being expensive no matter the role being chosen. For me it's an ultimate area control/area denial ship as
ending up in a front arc is a death sentence for a lot of small ships (even flotillas) at medium range and can
hurt even at long range (especially with Concentrate Fire/Spinal Armament). Also ISD2 is the only Imperial ship that can equip Electronic Countermeasures which is more
important in this wave as lot of builds will be accuracy-heavy to deal with the Scatter on flotillas.
Admiral Darth Veggie: Speaking of upgrades, two weeks
ago, we had here an article about ISD 2 upgrades. There are many that seem to be mandatory like Electronic Countermeasures or Gunnery Team. But is there one where you think
it deserves more attention? What do you consider the most unrightfully neglected upgrade for the ISD (if there is one)?
Paul: First of all, I would say that while many ISD2 upgrades seem to be mandatory, none of them really are. While the default ISD2 loadout is Gunnery Team, Electronic
Countermeasures, XI7 Turbolasers I can see ISD2 that is opting for Ion Cannon Batteries instead of Leading Shots (to help against double-brace ships, Yavaris
in particular) or Spinal Armament instead of XI7 Turbolasers. In some fleets it may even be sensible to drop Electronic Countermeasures to save on points. However,
if I need to choose one underutilized upgrade for ISD2, I would go with Quad Laser Turrets. From my experience the damage from Quad Laser Turrets (especially against
Yavaris-powered attacks) can allow one to start dropping opponents bombers one round earlier which makes a huge difference in ships survivability. (And yes, Major Rhymer is a hard
counter against Quad Laser Turrets, however I think that with the rise of Rebel bombers and YT2400 swarms, Quad Laser Turrets is a solid investment and I expect to see
it more nowadays).
Admiral Darth Veggie: How do Ion Cannon Batteries help against double-brace ships?
Paul: Ion Cannon Battery critical forces defender to lose a command token or a shield. This shield loss is not affected by Brace, so essentially it translates into 2
damage before brace.
And in the case of Yavaris the critical will force it to discard squadron command token OR lose a shield, so its a bad deal either way.
Admiral Darth Veggie: Is there a nemesis for the ISD 2? A certain ship or fleet configuration that really gives you the creeps when commanding an ISD 2 into the field?
Paul: I don't think there is a single answer to this, as it depends on the composition of my fleet as well, but if I have to choose main threats, it'll be a tie between
Cracken Turbolaser Reroute Circuits corvettes and Yavaris B-wings.
Admiral Darth Veggie: Speaking of Yavaris powered B-wing horror, your fleet has no squads in it. How can those two ISDs survive bomber heavy lists without any squadron
screen against them?
Paul: It is one of the hardest matchups for this list, so the answer will heavily depend on the particular list composition and deployment. It can be "kill the carriers"
strategy. It may be "kill B-wings before they kill you" strategy.
Usually I expect to lose one of the ISDs in the exchange so it's really a question of getting it's points worth back.
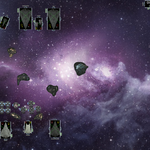
Admiral Darth Veggie: Then let us talk about a specific game. The images below (click to enlarge) are taken from your first preliminary round of the last big Vassal
tournament. It was the game against Irokenics you have won 10-0 with a MoV of 400 (the old tournament regulations were in place at that time). The first image presents the situation at the
beginning of round 1. The second one is taken during round two, after you have moved one of your ISDs right in the middle of all these bombers and fighters. What was your tactic there?
Paul: Before I answer, I'll add some important context here: in this game I was fortunate enough to get first player (my opponent had no bid at all) and we were playing
Fire Lanes (one of my favorite missions to select with a double-ISD fleet as it negates my deployment disadvantage). Once the deployment was done, I knew that I should be able to table his
fleet, and it was only a question of the amount of my losses. His bomber force wasn't particularly frightening with only 4 bombers (and less than 7 damage per round average). So my tactic was to
throw in my ISDs hard and fast as I knew I would be able to outmaneuver him (as I had last-first activation and both my ISDs would move after all his fleet) and I was severely outgunning him in a
direct confrontation. My only worry was his Demolisher speeding up and escaping so I tried to set up my ISD to block most of his possible moves. As it happened my opponent underestimated
the speed of my ISDs and kept his Victory Class Star Destroyer at speed 0 during round 2 (which allowed me a full front arc ISD shot into defenseless VSD next round).
Admiral Darth Veggie: That means in such a situation you completelly ignore the enemy squads and simply gun for the capital ships? Or did you took some effort to also attack the
bombers?
Paul: Yes, as long as I can realistically table my opponent's fleet (or don't expect much damage from the squadrons or to damage them enough).
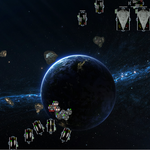
Admiral Darth Veggie: Let us examine a second game against a squadron heavy fleet - the one against Gowtah that you had barely lost by the smallest possible MoV, namely zero, and
which was the end for ISDs in the last tournament. Although, there are no Yavaris powered B-wings in your opponents fleet, there is something as bad as it: Yavaris powered
Scurrg bombers.
In the six images below we can see the state of the game at the beginning of each game round. You were first player and chose Hyperspace Assault as objective (Admonition was
chosen as objective ship). We can see that at the beginning of the game the fleets were quite apart from each other. What was your tactical approach for setup and the first rounds?
Paul: In this game I was severely outdeployed, so I decided to deploy in the corner and sweep across the board. This also would allow me to keep potential hyperspace
locations under fire and to delay Admonition return from hyperspace (which would skew my activation disadvantage even further). Essentially the game was about either me getting to Gowtah's
transports and blowing them up (to get first/last activation with ISD) or him bombing my ISD's with Yavaris/Admonition before I could achieve that goal.
Admiral Darth Veggie: At the beginning of round 4, all enemy ships and squadrons were still on the board. How did you adjust your tactics against the enemy squadron superiority?
Paul: I would say that at the beginning of turn 4 the strategic situation was more or less decided: I already lost one Gozanti, my ISD1 was going to die this turn
(with 2 hp left and flying into a bomber cloud), Admonition was going to survive as I didn't do enough damage and ISD2 was out of position to threaten her, Yavaris was going to
die that turn or in the worst case was guaranteed to die on next turn (I needed to get 7 damage or double accuracy from the front shot to finish her off), so squadrons were no longer a threat (as
they wouldn't be able to finish a second ISD in the 3 rounds remaining and were out of position/activations to get gozantis) but points wise my only chance of winning was to get all the remaining
transports with ISD2 shots (which was hard but not impossible). I think that summarizes my thinking at the beginning of that round.
Admiral Darth Veggie: Let us switch the topic and talk about the main reason for this interview: last week's article, the Achilles heel of the ISD 2. How do you keep your
opponent within the front firing arcs of your ISDs?
Paul: The two main contributors are navigation, activation advantage and an almost fanatical devotion to the Emperor  . As long as you can delay activating your ISD until after the intended target, you can navigate
into a position in which the next move will force the target to fly into a front arc - or in the attempt to dodge it, to fly into a range of a second ship (preferably also an ISD).
. As long as you can delay activating your ISD until after the intended target, you can navigate
into a position in which the next move will force the target to fly into a front arc - or in the attempt to dodge it, to fly into a range of a second ship (preferably also an ISD).
For example if the corvette in your test would start just outside on red range of ISD2
straight across and moves first it has no chance to avoid front arc in either next turn or the turn after next.
Admiral Darth Veggie: Activation advantage and ISD seems a bit close to be mutally exclusive: Even your ISD fleet that has no squadron screening has (merely?) five ships. I can
see, how during Wave II times that was close to a guaranteed activation advantage. However, nowadays having at least five ships is quite common, not necessarily the majority of lists, but quite
common. How can an ISD based list cope with so many nimble rebel ships?
Paul: Well, you need to look not only at absolute numbers but at a bigger picture as well - how long the opponent can delay activating a ship (or ships - and ISD2 with its
range can threaten multiple ships at once) under threat? And having 4 or 5 activations helps a lot here (even against 6 ship lists - and in Wave IV 6 activations is the new 5, I believe).
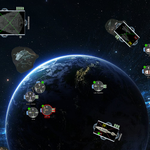
Admiral Darth Veggie: So, let us take this approach to a real game: the one you played against Dorrin. He commanded a five ship fleet with Ackbar. It consisted of an Assault
Frigate, Home One, and three Corellian Corvettes with Turbolaser Reroute Circuts. As in your fleet, there were no squadrons present. This time, you were first
player and picked Intel Sweep as objective. Again we can see the map at the beginning of each round. The game ended at the beginning of round 5, when your ISD 2 took the last remaining
enemy ship, the Assault Frigate with Ackbar, out of the game, resulting in a 475 point Margin of Victory in your favour. What were here the tactics you considered during game
setup?
Paul: In this case I was a first player and we played Intel sweep, so I needed to protect my raider for at least 2 rounds to pick up the tokens and to kill his
Intel sweep corvette before it has a chance to pick up a third token. I was going to try to kill corvettes first as once they'll navigate around front arc they'll be impossible to catch (even
with tractor beams that this fleet had) and multiple corvettes with Turbolaser Reroute Circuts and Ackbar shots can be a real problem for an ISD. Therefore I deployed my ISD2 right
across the corvettes with the intention of doing a last-first activation to catch at least one corvette in a front arc and to make it impossible for the objective corvette to be in the range of a
second token without getting a front arc ISD shot next round.
Admiral Darth Veggie: Was deployment here everything? I like to give the issue at hand a wider scope. The ISD seems to be the strongest ship in the game, however thanks to Ackbar
(or the super maneuverable and damage intense Corvettes with Turbolaser Reroute Circuts) it is easily outgunned at red range. Your fleet can hit with a maximum of 13 red dice in one game
round (not counting concentrate fire commands). Your opponent had 21 in contrast. And a triple of Ackbar powered Assault Frigates comes to 30 red dice in one single game round. How can
ISD based fleets cope with that – in this specific game and in general? Is it merely thanks to deployment?
Paul: I think it is mainly about navigation and understanding where your ships and opponent ships are likely to be next round and a round after next, so initial deployment
also matters a lot. If you're facing Ackbar fleet, you don't want to fight at long range and you want to be in the front arc, so you try to navigate accordingly, while your opponent
tries to prevent you from doing that. For example, in this game I was able to outnavigate my opponent and my ISDs ended up being in the medium range round 2. Also I think that Ackbar
shots were done only once or twice for the whole game as my damaged ISD2 ended up in a front arc of both Home One and the Assault Frigate.
Admiral Darth Veggie: Maybe this is related to the issue at hand: I normally fly my ISDs with speed 1 to be in close formation with supporting ships (Repair Crews
flottilas and Targeting Scrambler Interdictors) - but especially in order to use my front firing arc as long as possible. However, if I watch your games that seems to be the totally
wrong approach. What is your opinon on speed and ISDs?
Paul: While sometimes flying at speed 1 is a right choice, it makes your future movement predictable and makes ISD easier to avoid. I usually use speed 2 to keep things
unpredictable, as with a Navigation order or token the ship can be anywhere between speed 1 and speed 3 (it also allows slower speed 2 ships to stay close enough, although I recommend using Comms
Net instead of the Repair crew as the range is much higher and the ability to pass different tokens is more flexible). I also don't expect to get more than one full front-arc shot against a ship
(unless it is set up to be in a forever ram situation) as after the shot and ISD movement the ship in question should be able to navigate around front arc (as long as it is still alive).
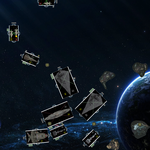
Admiral Darth Veggie: Let us go to the most interesting game: the one against Ginkapo. He won the last big Vassal tournament. However, you did meet him during the
preliminary rounds and beat him by a Margin of Victory of 221. First, I want to provide some background to the game, starting with some words about his fleet. In its center are two MC30
Torpedo Frigates. What makes them special is that they are equipped with Enhanced Armament which enables them to get the full Ackbar benefit. One of their broadsides fires
3 red dice, 2 blue, and three black. This is as much punch as the front firing arc of an ISD 1 has. The fleet is rounded up by a MC30 Scout Frigate with Ackbar on it, a
Corellian Corvette, and a transporter flotilla. Hence, Ginkapo also had five ships. No activation advantage for you.
In this game Ginkapo was first player and chose Most Wanted as objective. You decided that one of his torpedo frigates and your Comms Net Gozanti are objective ships.
If we take a look at the image that shows the game setup at the beginning of round 1, one cannot stop by being baffled about your deployment. That Motti's Gozanti sneaks along the map's
borders does not surprise very much. However, that your ISD 1 is following its trail seems insane. The ISD 1 was the fourth deployment of your fleet (the ISD 2 was last). What had you in mind
doing this move?
Paul: I won't lie, I prepared this deployment beforehand. Let me give you some context - we both played against each other fleet before so we knew what these fleets were
capable of and were preparing for this game. At that time my usual tactic was to deploy straight across opponent's fleet and joust so I was sure that Ginkapo was prepared against it (as you can
see even from obstacle deployment) and I needed something new. I expected him to try to hunt Motti with Sensor Team equipped Admonition as she could kill Motti even
from a medium range, so I decided to do 1-2 punch tactic that is usually used by MC30 fleets. In this game I had some deployment advantage (as everything in Ginkapo's fleet except one MC30 would
need to be on the table before I would deploy my ISD's) and activation parity (which meant that he wouldn't be able to first-last my ISD as long as the second ISD was out of range). So I decided
to deploy ISD 1 in a way that gave me a flexibility to decide where it'll do a turn and start flying across a board as well as to threaten anyone trying to attack Motti.
As a result I would say that the first part of the game was a hunt for Admonition (with her advantage being negated by Most Wanted) that was very skillfully flown by
Ginkapo and avoided front arcs the whole game.
Admiral Darth Veggie: During round 2 and 3, you were not able to get any enemy ship in the front firing arcs of your ISDs. However, you turned your ISD 1 and it was obvious from
that point that it would soon enter the game. At the beginning of round 4 you destroyed Admonition with the side firing arc of the ISD 1 and the second MC30 Torpedo Frigate with its
front firing arc. After two rounds without any major hits from your ISDs, you effectively crippled his fleet. How could that happen? Was there a long term plan finally bearing fruits in round 4?
Paul: I would say so. Keep in mind that while Admonition was successful in avoiding ISD 2 front arc, it forced her to navigate in a predictable way and denied her
own shots while she was slowly crippled by multiple attacks (those Most Wanted dice did add up). As a result ISD1 in a third round denied Admonition a possibility to attack
Motti and after it moved at the end on round, it was able to threaten 2 MC30s with a close range front arc shot (which more or less guaranteed that one of them will die next round). I
expected Admonition to navigate to speed 4 after the shot and fly away (and was planning to try to intercept her with ISD 2 later in the game), however Ginkapo decided to go all in and
kept Concentrate Fire on Admonition, resulting in her death that round.
Essentially, the usual MC30 tactic is to do an attack run relying on Admonition/Lando to survive one attack and on their speed to be out of the kill zone afterwards. By delaying
my second ISD 1 tried to counter this tactic by creating a second kill zone for MC30s trying to speed up away from combat.
Admiral Darth Veggie: When I initially asked you about the most important aspect of the ISD 2, you mentioned that you consider it to be the ultimate area control/denial ship.
At that time it seemed to me to be an empty phrase. Now, after we discussed the game against Dorrin where your ISD maneuvering denied your opponent to get the valuable Intel Sweep tokens and
after we discussed the the game against Ginkapo where we saw how Admonition was unable to attack Motti and was driven into the arms of the ISD 1, I think I have understood your approach.
Now, the polite thing to do would be to offer you some dark side carrots in exchange for this tactical enlightment. However, because Darth Veggie is a selfish Sith Lord, he will be impolite
and combines the tactical insights taken from you with his superior darks side carrots to sweep across the galaxy with invincible ISDs! Thank you very much for this interesting interview and
hopefully we will meet sometime in the future at a gaming table (even if it will be a virtual one)!


Kommentar schreiben